티스토리 뷰
처음하는 팀 프로젝트!!
설레이는 마음을 다잡고 프로젝트를 해쳐나가 봅시다.
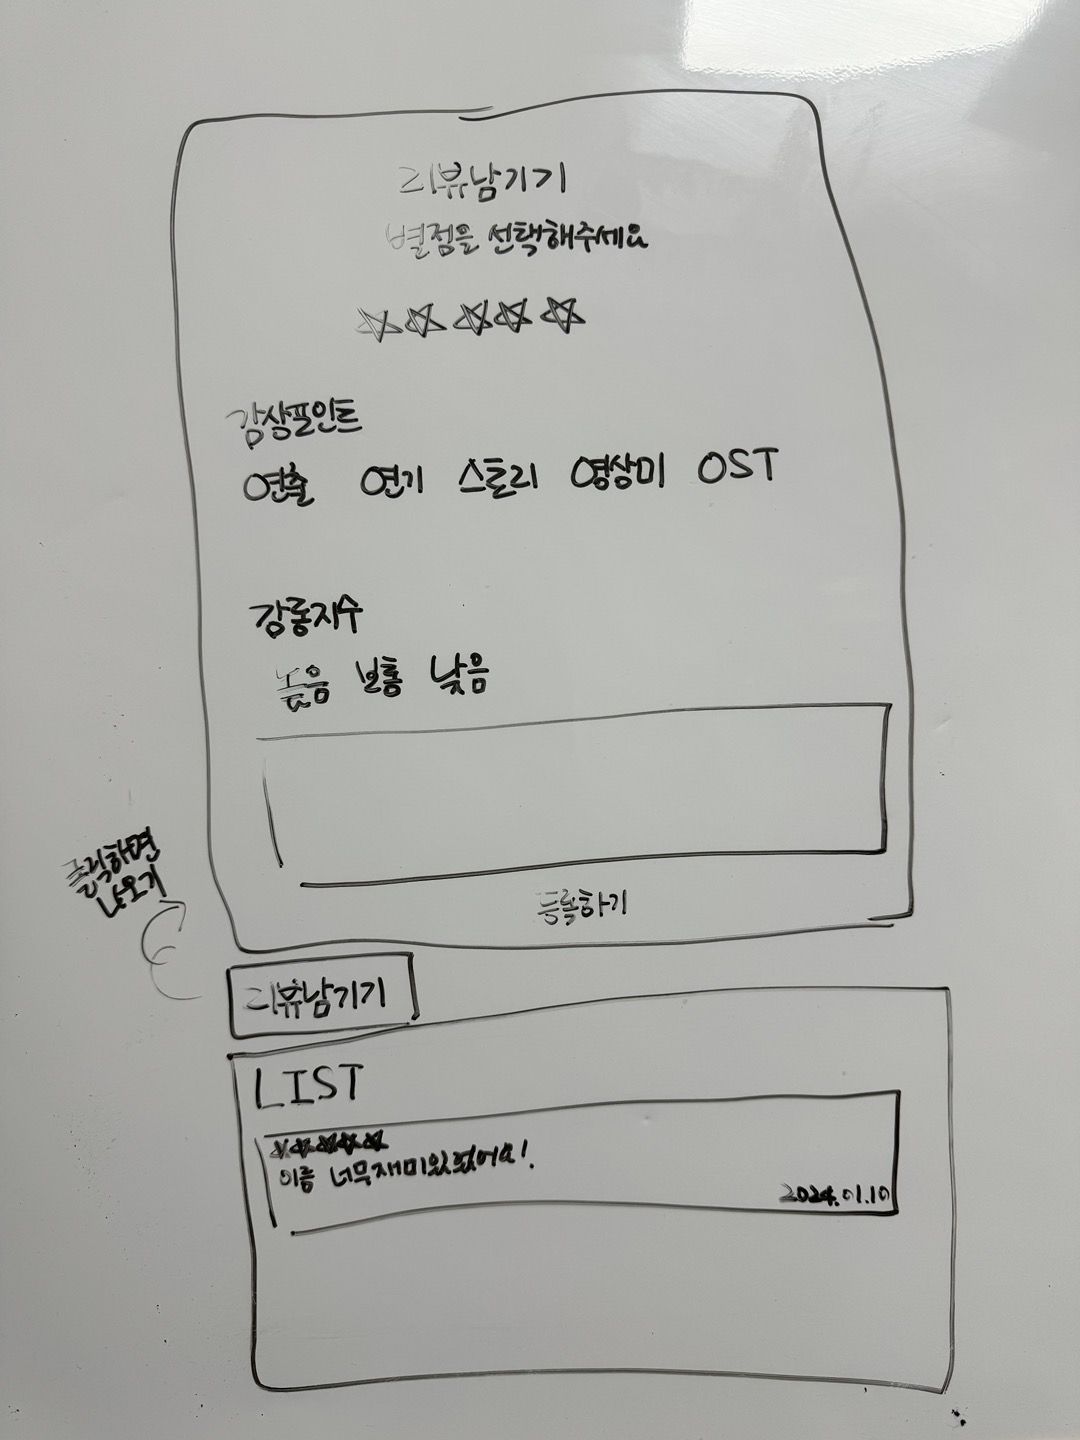
내가 맡은 부분은 상세페이지 안에 리뷰를 작성할 수 있도록 리뷰란을 만드는 것 이었다.

내가 구현하고자 하는 리뷰창이다.
상세페이지 안에 들어가야하는 것이다 보니 많은 부분을 차지하는 것이 좋아보이지 않았다.
그래서 리뷰를 작성할 수 있는 부분은 modal, 받은 값은 상세페이지 하단 리뷰리스트에 보여지게 만드는 것이 목표였다.
비교적 가장 쉬운 HTML을 작성하고
그리고 기본적 이어야 하나 어려웠던 css와 모달창을 구현한 리뷰남기기 창이다.

HTML / 별점 구현하기
<div class="getstar" id="getstar">
            <label class="starlabel">
              <input
                class="star"
                id="star2"
                type="radio"
                name="star"
                value=""
              />
              <span class="staricon"></span>
            </label>
            <label class="starlabel">
              <input
                class="star"
                id="star4"
                type="radio"
                name="star"
                value=""
              />
              <span class="staricon"></span>
            </label>
            <label class="starlabel">
              <input
                class="star"
                id="star6"
                type="radio"
                name="star"
                value=""
              />
              <span class="staricon"></span>
            </label>
            <label class="starlabel">
              <input
                class="star"
                id="star8"
                type="radio"
                name="star"
                value=""
              />
              <span class="staricon"></span>
            </label>
            <label class="starlabel">
              <input
                class="star"
                id="star10"
                type="radio"
                name="star"
                value=""
              />
              <span class="staricon"></span>
            </label>
          </div>
HTML / 포인트 구현하기
<div>
            <h3>감상포인트</h3>
            <div class="aspects" id="aspects">
              <div class="aspect-item">연출</div>
              <div class="aspect-item">연기</div>
              <div class="aspect-item">스토리</div>
              <div class="aspect-item">영상미</div>
              <div class="aspect-item">OST</div>
            </div>
          </div>
          <div>
            <h3>감정포인트</h3>
            <div class="emotions" id="emotions">
              <div class="emotion-item">공포</div>
              <div class="emotion-item">흥미진진</div>
              <div class="emotion-item">슬픔</div>
              <div class="emotion-item">감동</div>
            </div>
          </div>
HTML / 리뷰 작성 창 구현하기
          <input
            class="input"
            id="impressions"
            name="impressions"
            placeholder="영화가 어땠는지 리뷰를 작성해 주세요!"
          />
HTML / 이름과 패스워드 받기
          <div class="getpersonal" id="getpersonal">
            <input
              class="name"
              type="text"
              id="name"
              name="name"
              placeholder="이름을 입력해 주세요!"
              pattern="[A-Za-z가-힣]+"
              title="문자만 입력해 주세요."
              required
            />
            <input
              class="password"
              type="text"
              id="password"
              name="password"
              placeholder="확인할 번호를 입력해 주세요"
              oninput="this.value=this.value.replace(/[^0-9]/g,'');"
              maxlength="4"
              required
            />
            <p id="nameError" style="display: none; color: red">
              문자만 입력해 주세요.
            </p>
            <p id="passwordError" style="display: none; color: red">
              4자리의 숫자를 입력해 주세요.
            </p>
          </div>
HTML / 버튼 구현하기
          <div class="getdata">
            <button id="submit">등록하기</button>
            <button id="close" class="close">취소하기</button>
          </div>
물론 차후에 수정될 수는 있으나 오늘은 위 코드들 만드는 것 만으로도 벅찼으므로...
간단하게 작성하고 넘어가도록 하겠다🤪😏
'TIL' 카테고리의 다른 글
| 2024.01.13 프로젝트 마지막 단계. 코드 합치기 (2) | 2024.01.13 |
|---|---|
| 2024.01.11 팀 프로젝트 2 (0) | 2024.01.11 |
| 2024. 01. 09 node, yarn 삭제 후 재설치.. (0) | 2024.01.09 |
| 2024. 01. 07 TMDB API 연동 프로젝트 코드 설명해 보기! (0) | 2024.01.07 |
| 2024.01.06 Callback, Promise (0) | 2024.01.06 |
공지사항
최근에 올라온 글
최근에 달린 댓글
- Total
- Today
- Yesterday
링크
TAG
- Warning: Each child in a list should have a unique "key" prop.
- Fetch와 Axios 의 장단점
- 에러모음집
- simple Icon 사용방법
- 별점만들기
- 영화 별점
- 별점 색채우기
- 유효성검사
- 영화별점만들기
- styled component 조건부 사용방법
- 유효성검사 css
- axios 설치하기
- nextjs 토큰 만료처리하기
- axios instance 작성하기
- git cache
- readme 이미지 추가 방법
- Warning: validateDOMNesting(...): <li> cannot appear as a descendant of <li>
- styled component 설치방법
- styled component 사용방법
- axios CRUD
- axios 사용하기
- readme 역할
- Warning: A component is changing an uncontrolled input to be controlled.
- readme작성해보기
- readme 작성해야 하는 이유
- readme 작성 방법
- styled component GlobalStyle 사용방법
- axiosinstance 사용 시 토큰 사용 법
| 일 | 월 | 화 | 수 | 목 | 금 | 토 |
|---|---|---|---|---|---|---|
| 1 | 2 | 3 | ||||
| 4 | 5 | 6 | 7 | 8 | 9 | 10 |
| 11 | 12 | 13 | 14 | 15 | 16 | 17 |
| 18 | 19 | 20 | 21 | 22 | 23 | 24 |
| 25 | 26 | 27 | 28 | 29 | 30 | 31 |
글 보관함
